Monday, 31 May 2010

How to: Blender tutorial 5 - Materials and Textures


3D animation may seem to be the realm of big budget movies, and certainly major companies like Industrial Light and Magic use big budget software. Thankfully, the if you want to try 3d animation as a hobby, you can do an impressive amount of work using free software such asBlender. Alot of the principles are transferable across animation software in general.


one -- the most important point

ALWAYS add the material BEFORE you add the texture.

two -- adding materials to an object

Material” is basically just another word for ‘colour’ – by adding a material you are colouring your object. To do this:

In object mode, right-click to object you want to give a material too (ie select it).

Select the shading button:


Then click ‘Add new’. This will open up a panel of buttons where you can assign and edit your material:


three -- adding textures

Once you’ve added your material, you can give it a TEXTURE. Textures are fantastic… there are several preset ones you can add – or you can load in a JPEG image – or even an API animation!!

To add a texture to your material, keep the material button selected and click on the texture button. Then click NEW. The following buttons will appear:


Click on the ‘texture type’ arrow – to reveal the pull-out menu:


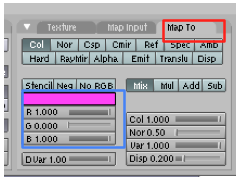
Once you’ve created a texture and gone back to the materials buttons, you will see that the panel on the right has changed:


From this box there are two things you can do:

1) If you select the ‘Map to’ button you


can change the colour by altering the


sliders – like you did to change the


colour of the material. You can see the


results in the box on the far left.

If you select the ‘Map input’ button
you can change the shape of the
texture; use the x, y and z sliders to
stretch and skew the texture.
The offs (offset) ones change the
orientation of the texture and the size
changes the dimensions.


When you’ve added your material (and your texture) to your object when you press shift-z you’ll be able to see them in 3D mode without having to render them (though the quality will be low).

four -- halo effects

Halo effects are great for ‘magic’. They produce effects like stars. They can be animated so that the halo grows and shrinks.


Basically they emit light from every vertex. So the first thing you need to do if you want to achieve a basic halo effect is find a simple object (like a cube) and delete every vertices but one.

Then you go to the materials buttons again and click on ‘halo’:


This is what you will see…


There are also some other effects you can apply, such as:


five -- adding JPEG pictures as textures

This can have so really good effects and can be useful when you know exactly what you want. (For example in the ‘Magic book’ render, I created the pages of the book in publisher and added them as a texture to the book object in Blender).


Make sure you have assigned a material to your object, then go to the texture buttons. This time, select IMAGE from the pull up menu:


Then click on load image and then browse until you find the JPEG image you want. Easy :). (You can edit this image in the same way you can edit textures, by going back to the material buttons and selecting map to etc).

You can combine images and textures by creating one (either and image or a texture) then going to the texture buttons and clicking an empty box:


then repeat the steps above.

Friday, 28 May 2010

Discussion: the irony of Scottish beavers - more of a rant, really


Trying hard not to make this sound like a dodgy post... but anyway...


This has been inspired from a short I saw today on the bbc website. It's a followup from a reintroduction and release of beavers in Knapdale Forest in Argyll, Scotland last year. The behaviour of the animals were being documented, and they were doing what beavers would be expected to do - felling trees for both food and for making dams for their homes. From some perspectives this reintroduction of a lost species was therefore going very successfully. They seemed to have settled in nicely and being treating the place as 'home'. The irony of this, for me, comes from the 'other side of the story'.

As the presenter pointed out, some people has seen the actions of the beavers as 'damaging the landscape' - to which Nick Purdy, from the Forestry Commission, countered 'they're not indiscriminate, their selective about what they fell... they don't fell everything... They select their pond, they'll stay in it a good number of years, build a bigger lodge which will will flood a bigger area ... and create habitat and diversity. Then they move on and everything retreats back again, it's a cycle...'.

So, to me it seems the beavers were essentially being semi-nomadic subsistence farmers; using only what they needed to survive - and doing so in a way which, granted, changed the landscape around them, but in a way which supported the ecosystem in which they lived. They also had a natural tendency to move around and let the landscape 'recover' over time. Now, correct me if I'm wrong but that sounds like an ideal symbiotic relationship with the environment.

The real point I'm trying to make is the audacity with which any human can make a statement like 'oh look they're damaging the landscape'. Not to put too finer point on it, but if we lived anything like the beavers lived, our environment would be a hell of a lot happier. We devastate entire rainforests for paper, most of which is disposed of after a single use, or rip oil out of the ground for plastics and fuel (among a multitude of uses), which similarly get disposed of indiscriminately - to name just acouple of ways we're 'interacting' with our landscape. And yet the humble beaver, epitomising environmental living, is victimised for felling afew trees in one of the few forests we've decided not to demolish... Amazing.

Thursday, 27 May 2010

Human-borne computer viruses... a sign of things to come?


Casually flicking through the bbc news website, as I tend to do whislt drinking my tea in the mornings, I came across
this rather worrying article...

It tells about the rather cavalier experiment performed by Dr Mark Gasson, on himself. (Haven't countless comics/movies warned against doing things like that?!). But yes, Dr Gasson had apparently been issued with one of those new spangly RfiD chips.

They've been used on barcodes and merchandise since the early 1990s, and have recently been developed to sizes which make them applicable to money, passports - and animals. Recent applied to say, pet identification, then to something which can be inserted into people which contains their medical records, which was taken up happily by some American hospitals. Then there was the happy application (which I'm sure George Orwell would have shuddered at), where the Jacobs' family in America all volunteered to all get inserted with RfiD chips which permanently track their location using GPS... for their own safety.

But Dr Mark Gasson helped to illustrate one of the more scary disadvantages of such technology, by having a chip inserted into his hand which he then infected with a computer virus. Which was then able to be passed onto the various devices the chip interacted with. This has some fairly awesome implications, not limited to what could happen if the computer chip virus could be passed from one RfiD chip to another. The potential consequences for data corruption for medical records alone could be quite scary - and that's certainly not going to be the limit of this technology.

Food for thought...

Monday, 24 May 2010

Discussion: the next steps towards teleportation

Just thought I'd share an article which made me happy - the continuing background progress into teleportation. According to a recent article, scientists have now managed to teleport information between photons over a distance of almost 10 miles, smashing the previous achievement of afew metres.

This quantum teleportation is not an experiment in say, moving one thing from here to somewhere over there. Instead it works by making the thing over there dependant on the thing here, so by manipulating the thing here you an alter the thing over there.

This makes it alittle more applicable to transporting information, rather than people. You know, eventually. But the scientists pointed out that the 10 miles they've just achieved nicely covers the distance between Earth and Space, leaving a whole 'world' of possibilities. Ahem.

For more info the whole article is here :)

Sunday, 23 May 2010

How to: Blender tutorial 4 - Editing objects and Vertices (part 2)


3D animation may seem to be the realm of big budget movies, and certainly major companies like Industrial Light and Magic use big budget software. Thankfully, the if you want to try 3d animation as a hobby, you can do an impressive amount of work using free software such as Blender. Alot of the principles are transferable across animation software in general.

This is the fourth in a series of tutorials I've written for Blender - which will introduce you to the basics of editing objects and vertices. This is quite a big subject even then, so I've split it into two, and this is the second part. But for those of you who want to skip:

**** **** **** **** ****


**** **** **** **** ****

one -- deleting vertices

In EDIT mode:

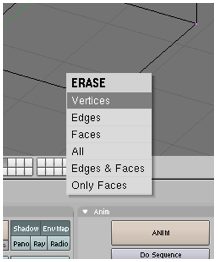
Right-click the vertices you want to delete then press Delete. An option-box appears – choose vertices:


two -- to create new faces

If you have 3 or 4 vertices without a face connecting them you can create a face between them if you want to:


In EDIT mode:

Use shift and the right-mouse button to select the vertices you want to create a face between..

Press F. A face is created between the points you selected:


three -- the boolean technique

The “Boolean technique” is a fancy name for cutting out shapes with other shapes.

In OBJECT mode select the two meshes. Then press the W key.


This will bring up the Boolean menu. (In EDIT mode the W key brings up a different menu, so don’t get confused!). There are three techniques that can be achieved using the Boolean technique:


four -- making more vertices

Sometimes you need to add more vertices to let you can manipulate your object as you want to. To do this we must ‘split’ existing vertices.

Firstly, ensure you are in EDIT mode.

Select the vertices of the entire object (by pressing A) if you want to create more vertices equally through it, or if you only want to increase the vertices within an area, select the vertices you want to split.


Ensure that the bottom row of buttons is set to the ‘edit vertices’ made by left-clicking this button:


Then go to the box headed "mesh tools" and click "subdivide".

Alternatively; press W. (Remember, this brings up the Boolean menu in OBJECT mode – but in EDIT mode it brings up a menu which enables you to, among other things, subdivide):

Select subdivide – selecting multiple times increases the effect. U will undo it:


five -- extruding shapes

This is good for duplicating/lengthening shapes and creating pipesetc

Go into EDIT mode: select the vertices where you want the shape to extrude from…

Then press E and select extrude with the left-mouse button. When you move the mouse the object will ‘grow’… to set press the left-mouse button.


Alternatively, you can perform the same action as pressing the E key by:

Going to the edit vertices buttons…


Then go to the box headed "mesh tools" and click "extrude".


six -- proportional vertex editing


This makes a big difference: it affects whether a slope is smooth of sharp:

Go into EDIT mode. First select the vertices you would move. Then press O (the letter). The Proportional Vertex editing button appears at the bottom of the window.


When you left-click the Proportional Vertex editing button you will be able to choose what kind of edge you want on the moved vertices:


Friday, 21 May 2010

Note: a small homage to brilliance


The google signpainter gets many many points today, for the awesomeness of pacman google!

At first I was just happy to see it - and thought it was one of their more inspired ideas for their logo. But then I clicked it and realised it was playable....it gave me great joy - doubled when I found out there was multiplayer, and me and my boyfriend enjoyed a bit of geekish nostalgia together ^_^

Apparently done in honour of Pacman's 30th anniversary, and well worth a look ^_^


Wednesday, 19 May 2010

Discussion: How dangerous are free bags?

So, I was in town today. I bought many clothes, which I put in my shoulderbag. I also went to M&S and bought food, including raspberry jelly, which I also put in my shoulderbag. Long-story short, the jelly exploded and my clothes need some rapid protection - so I needed a plastic bag. The closest place was Clinton Cards, and I hoped the store wouldn't mind some free publicity with me putting clothes I bought at another store in their bag... I went in and asked, and I was told I couldn't have a free bag. Understandable, economically. But the awesomeness comes from their excuse... "We don't give out free bags for security reasons". Security reasons?? Seriously? Yes, apparently.

Which got me intrigued. What security reasons could there be? I was going to make this a top 10, but I could only think of 5...

1) Because it is empty when it leaves the store, it could be blown away by a gust of wind and land on someones head, thus resulting in them running into a wall

2) You could take their free bag, walk outside, and use put it over your head to commit some robbery in another store, thus giving them bad publicity

3) You could take their free bag, put it over your head and commit robbery in their store thus being ironic

4) The free bag could be melted down, and moulded into the last ingredient in some fiendish bomb construction

5) The bag could later be corrupted by being recruited by some evil group for it's own nefarious pruposes

That is all.