
3D animation may seem to be the realm of big budget movies, and certainly major companies like Industrial Light and Magic use big budget software. Thankfully, the if you want to try 3d animation as a hobby, you can do an impressive amount of work using free software such asBlender. Alot of the principles are transferable across animation software in general.
This is the fifth in a series of tutorials I've written for Blender - which will introduce you to using materials and textures. But for those of you who want to skip:
**** **** **** **** ****
**** **** **** **** ****
one -- the most important point
ALWAYS add the material BEFORE you add the texture.
two -- adding materials to an object
“Material” is basically just another word for ‘colour’ – by adding a material you are colouring your object. To do this:
In object mode, right-click to object you want to give a material too (ie select it).
Select the shading button:

Then click ‘Add new’. This will open up a panel of buttons where you can assign and edit your material:

three -- adding textures
Once you’ve added your material, you can give it a TEXTURE. Textures are fantastic… there are several preset ones you can add – or you can load in a JPEG image – or even an API animation!!
To add a texture to your material, keep the material button selected and click on the texture button. Then click NEW. The following buttons will appear:

Click on the ‘texture type’ arrow – to reveal the pull-out menu:

Once you’ve created a texture and gone back to the materials buttons, you will see that the panel on the right has changed:

From this box there are two things you can do:
1) If you select the ‘Map to’ button you
can change the colour by altering the
sliders – like you did to change the
colour of the material. You can see the
results in the box on the far left.
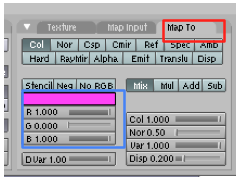
If you select the ‘Map input’ button
you can change the shape of the
texture; use the x, y and z sliders to
stretch and skew the texture.
The offs (offset) ones change the
orientation of the texture and the size
changes the dimensions.

When you’ve added your material (and your texture) to your object when you press shift-z you’ll be able to see them in 3D mode without having to render them (though the quality will be low).
four -- halo effects
Halo effects are great for ‘magic’. They produce effects like stars. They can be animated so that the halo grows and shrinks.

Basically they emit light from every vertex. So the first thing you need to do if you want to achieve a basic halo effect is find a simple object (like a cube) and delete every vertices but one.
Then you go to the materials buttons again and click on ‘halo’:

This is what you will see…

There are also some other effects you can apply, such as:

five -- adding JPEG pictures as textures
This can have so really good effects and can be useful when you know exactly what you want. (For example in the ‘Magic book’ render, I created the pages of the book in publisher and added them as a texture to the book object in Blender).

Make sure you have assigned a material to your object, then go to the texture buttons. This time, select IMAGE from the pull up menu:

Then click on load image and then browse until you find the JPEG image you want. Easy :). (You can edit this image in the same way you can edit textures, by going back to the material buttons and selecting map to etc).
You can combine images and textures by creating one (either and image or a texture) then going to the texture buttons and clicking an empty box:

then repeat the steps above.


No comments:
Post a Comment