
3D animation may seem to be the realm of big budget movies, and certainly major companies like Industrial Light and Magic use big budget software. Thankfully, the if you want to try 3d animation as a hobby, you can do an impressive amount of work using free software such as Blender. Alot of the principles are transferable across animation software in general.
This is the fourth in a series of tutorials I've written for Blender - which will introduce you to the basics of editing objects and vertices. This is quite a big subject even then, so I've split it into two, and this is the second part. But for those of you who want to skip:
**** **** **** **** ****
**** **** **** **** ****
one -- deleting vertices
In EDIT mode:
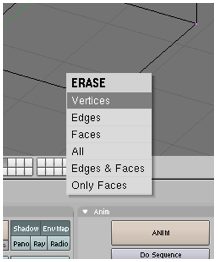
Right-click the vertices you want to delete then press Delete. An option-box appears – choose vertices:
two -- to create new faces
If you have 3 or 4 vertices without a face connecting them you can create a face between them if you want to:

In EDIT mode:
Use shift and the right-mouse button to select the vertices you want to create a face between..
Press F. A face is created between the points you selected:

three -- the boolean technique
The “Boolean technique” is a fancy name for cutting out shapes with other shapes.
In OBJECT mode select the two meshes. Then press the W key.

This will bring up the Boolean menu. (In EDIT mode the W key brings up a different menu, so don’t get confused!). There are three techniques that can be achieved using the Boolean technique:

four -- making more vertices
Sometimes you need to add more vertices to let you can manipulate your object as you want to. To do this we must ‘split’ existing vertices.
Firstly, ensure you are in EDIT mode.
Select the vertices of the entire object (by pressing A) if you want to create more vertices equally through it, or if you only want to increase the vertices within an area, select the vertices you want to split.

Ensure that the bottom row of buttons is set to the ‘edit vertices’ made by left-clicking this button:

Then go to the box headed "mesh tools" and click "subdivide".
Alternatively; press W. (Remember, this brings up the Boolean menu in OBJECT mode – but in EDIT mode it brings up a menu which enables you to, among other things, subdivide):
Select subdivide – selecting multiple times increases the effect. U will undo it:

five -- extruding shapes
This is good for duplicating/lengthening shapes and creating pipesetc
Go into EDIT mode: select the vertices where you want the shape to extrude from…
Then press E and select extrude with the left-mouse button. When you move the mouse the object will ‘grow’… to set press the left-mouse button.

Alternatively, you can perform the same action as pressing the E key by:
Going to the edit vertices buttons…

Then go to the box headed "mesh tools" and click "extrude".
six -- proportional vertex editing
This makes a big difference: it affects whether a slope is smooth of sharp:
Go into EDIT mode. First select the vertices you would move. Then press O (the letter). The Proportional Vertex editing button appears at the bottom of the window.

When you left-click the Proportional Vertex editing button you will be able to choose what kind of edge you want on the moved vertices:


No comments:
Post a Comment